Learn how to interface the HC-SR04 Ultrasonic sensors to the Arduino Uno with simple wiring and code. Here I will explain a step-by-step guide with wiring connection, how to program, how to boot program and how to test.
Table of Contents
Introduction
In this tutorial, we will learn how to interface the HC-SR04 Ultrasonic sensor to the Arduino Uno and the components required for the Arduino Distance Calculation.
Ultrasonic Sensors
The Ultrasonic Sensor is an electronic device that uses sound waves to detect objects and measure distance. This sensor has two processes to detect and measure by sending sound waves and receiving the echo when they bounce back from the objects.
The ultrasonic sensors are used in applications like Automatic Parking Systems, Obstacle detection, and industrial automation, etc.
Components
The main components required for this tutorial are,
- Arduino Uno
- HC-SR04 UltraSonic Sensor
- jumper wire
Arduino Uno
Arduino Uno is a development board that works with the Atmega328p microcontroller chip. It is a beginner-friendly development board. It has 14 Digital I/O pins, namely D0 – D13, and 6 analog pins, namely A0 – A5.
HC-SR04 UltraSonic Sensor
The HC-SR04 sensor is mainly used for distance measurement and obstacle detection in electronic and Arduino projects.
It is a low-cost, highly accurate and beginner-friendly ultrasonic sensor
it has 4 pins. They are
VCC – this pin is used to give the supply voltage to the sensor; it is supplied with +5V
GND – this pin is connected to the GND
TRIGGER – this pin is used to send ultrasonic sound waves
ECHO – this pin is used to receive the reflected ultrasonic waves
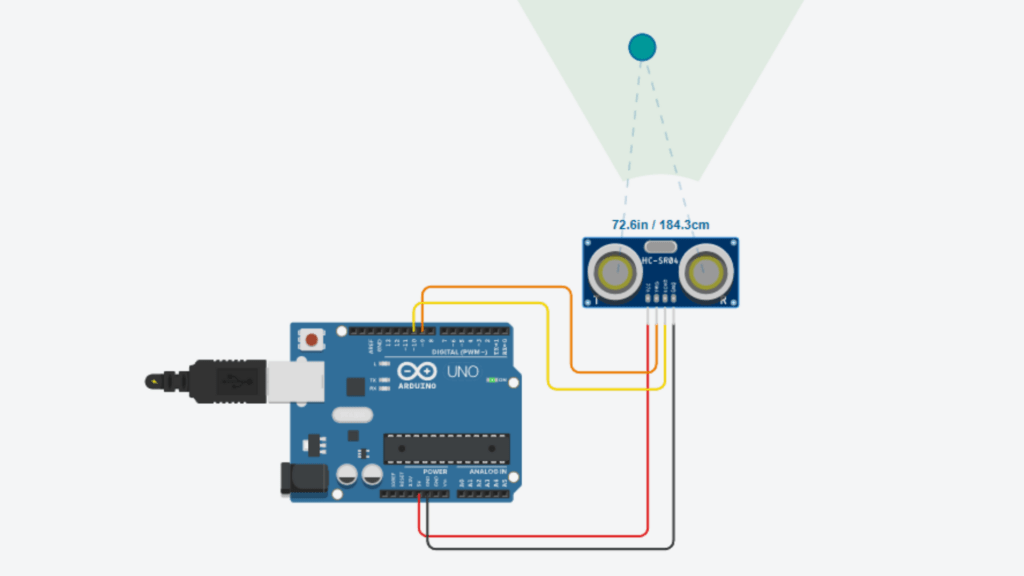
Connection details
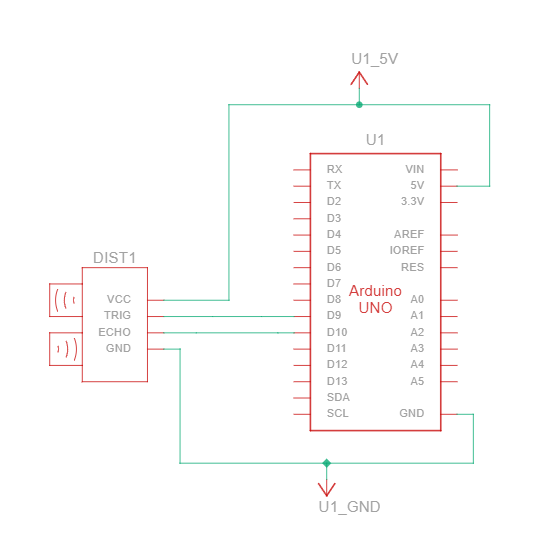
pin connection
| Ultrasonic sensor | Arduino Uno |
| VCC | + 5V |
| TRIGGER | D9 |
| ECHO | D10 |
| GND | GND |
programing Arduino Uno
Programming Arduino Uno is an easy thing, and we can do it in simple steps. Follow the steps below to program without any issues
Step 1: First, we need the Arduino IDE. If you don’t have Arduino IDE, then you need to download and install it by visiting Arduino.cc
Step 2: After setting up the software, you need to create a new sketch by follow this step in the menu > click Files > Click Create New Sketch, then give a name to it and save it.
Step 3: Now you can write the program in ide, for this tutorial, I give the code below. You can copy and paste it.
//Tutorial - Arduino Uno HC-SR04 Ultrasonic Sensor Interfacing
//Programmed By : KAVIKUMARAN
//Visit Website For More Tutorial : Sololearners.com
const int trigPin = 9;
const int echoPin = 10;

long duration;
float distance;

void setup() {
  Serial.begin(9600);
  pinMode(trigPin, OUTPUT);
  pinMode(echoPin, INPUT);
}

void loop() {

  digitalWrite(trigPin, LOW);
  delayMicroseconds(2);

  digitalWrite(trigPin, HIGH);
  delayMicroseconds(10);
  digitalWrite(trigPin, LOW);

  duration = pulseIn(echoPin, HIGH);

  distance = duration * 0.0343 / 2;

  Serial.print("Distance: ");
  Serial.print(distance);
  Serial.println(" cm");

  delay(500);
}Step 4: Verify the program for errors by clicking the verify button in the toolbar.
Step 5: If it has no errors, then we proceed to boot the program to the Arduino IDE.
Step 6: Connect the Arduino Uno and PC by using the Programming cable.
Step 7: To boot the program too arduino uno, first select the port and device.
Step 8: Click the upload button in the toolbar to boot the program to the Arduino Uno.