
Hi Learners, in this project tutorial, we will learn how to do the LED blinking using Arduino Uno in the Thinker CAD
introduction
LED blinking is a very beginner project in electronics and embedded systems, it is just like the “Hello World” program in programming languages. It will help to learn the basic concepts like digital output and simple circuit connections.
Components required
- Arduino Uno – 1
- LED -1
- Resistor – 1
- Jumper Wires
- Bread Board
- Arduino Uno programming cable
Arduino Uno
Arduino Uno is a very basic and beginner-friendly microcontroller development board that is used for starter projects by students, engineers, and hobbyists.
The Arduino Uno development board has an Atmega328p microcontroller chip . It has 14 digital I/O Pins named D0 – D13. It has 6 Analog Pins named A0- A5.
This Arduino Uno board has a USB converter built in, so we can easily boot the program to the Arduino.
It can be powered using 7 – 12V DC Voltage. If we connect to the overvoltage source, it may damage the development board
LED – Light Emitting Diode
A light-emitting diode, which is commonly called an LED, converts the electrical current into light energy using the principle of electroluminescence. When the electric current passes through the semiconductor material, the electrons recombine with the hole, producing the excess energy, which is called a photon
Resistor
A resistor is a passive component that is used to limit the flow of current in an electrical circuit. It will work by limiting the current flow and releasing it in the form of heat energy
Now we can do a simple calculation for choosing the resistor for this circuit.
You can learn more about how to select the correct resistor by reading the post
Now, the step-by-step guide to do the LED blinking tutorial
Circuit Connection
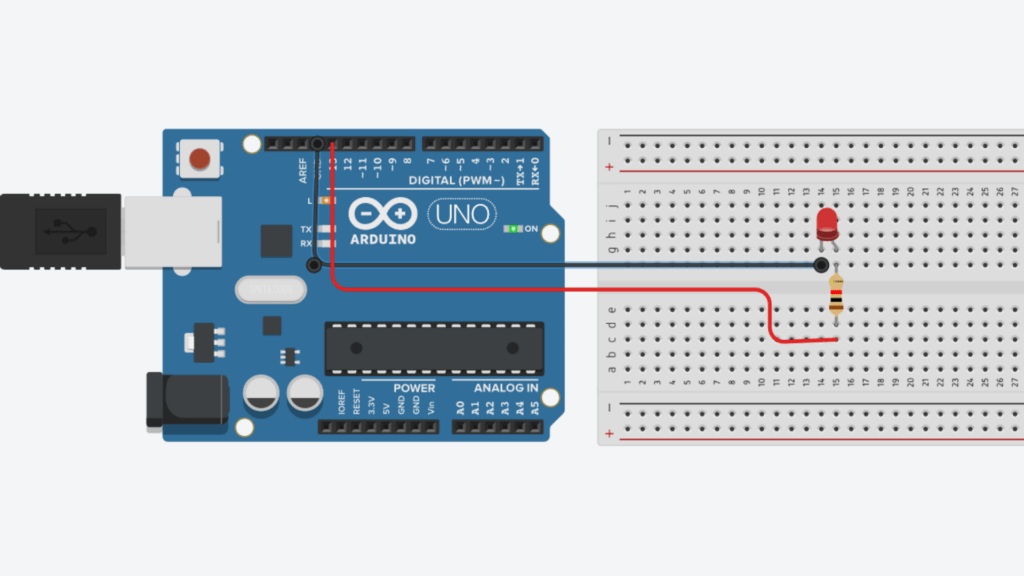
Step 1: Connect the resistor to the Digital pin D13 in Arduino Uno
Step 2: Connect the resistor’s other end to the LED Anode pin ( + )
Step 3: Connect the Arduino Uno GND pin to the LED cathode pin
Step 4 : Connect the Arduino cable to the Arduino Uno and PC
Step 5: Now write a program to blink the LED. Open the Arduino IDE, copy and paste the Arduino program below
// Project : LED Blinking Using Arduino Uno
// Programe By : KAVIKUMARAN
// Website : Sololearners.com

const int LED_PIN = 13;
void setup(){
  pinMode(LED_PIN , OUTPUT);
}

void loop(){

  digitalWrite(LED_PIN,HIGH);
  delay(1000);
  digitalWrite(LED_PIN,LOW);
  delay(1000);
}
Step 6: Now select the Board and Port, then click the verify button to check the code for correctness
Step 7: Upload the code to the Arduino Uno board
Once the program booted on the Arduino Uno, once the program successfully booted, the LED will start blinking continuously
For the above program, the LED will be ON for 1 second and OFF for 1 Second. You can change the duration by changing the value inside the function delay(1000). If you need it for 3 seconds, then change it to delay(3000).
I will provide the LED Blinking Using Arduino Uno thinker CAD project